If you’ve been looking for a way to develop color film at home, you’ve no doubt come across the Cinestill CS41 Color Simplified film developing kits.
But how good are the Cinestill CS41 color film developing kits?
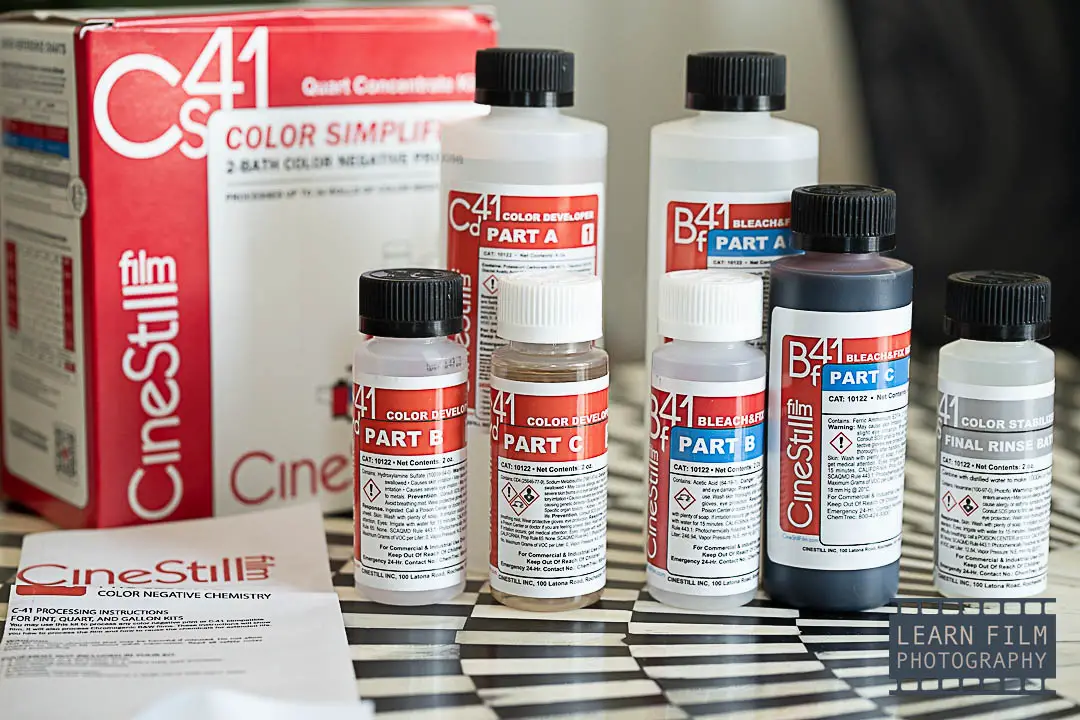
The Cinestill CS41 kit makes developing color film a simple and quick process while producing professional-quality results so long as proper temperature control is maintained. This kit is a rebranded Arista kit, coming with the same instructions, bottles, and chemicals only with a different logo.
The kits are called color simplified kits because they combine stop, bleach, and fix into one step called blix. Blix saves users time by using fewer chemicals, cuts down on water use, and requires only 3 storage bottles instead of 5.
These small kits come in three sizes: pint (500mL) quart (1L), and gallon (5L). There is also the option of getting the kits in both liquid or powder formats. The liquid kits are much quicker and easier to use but are more expensive because of their weight.
Get your Cinestill CS41 color developing kit on Amazon for the best price here.

How good are the results?
The Cinestill CS41 color film development kit results are nearly as good as any commercial lab. The Cinestill kit is able to create sharp images with vibrant colors matching the film itself and will help you save time and money (especially when extending the capacity) over getting film developed at a commercial lab.
The biggest difference is that a lab will replenish its developer each step, whereas a home C41 kit will slowly lose potency.
The most popular quart (1L) developer kits are rated for developing 8x rolls of 120 or 36 exp 35mm film (12 if you shoot 24exp rolls), after which the quality of results should steadily decline.
The 1L size of the kit means that you can develop 2x rolls of 120, or 3x rolls of 35mm in a larger tank, meaning you can use up the rated capacity of the kit in a single hour and a half if you have enough two developing tanks and enough film.
Personally, I love these kits for their speed and reliability of developing film. I can get through 4 rolls in just over an hour, where it takes a minimum of an hour and a half with black and white, or with a separated bleach and fix kit like the one by Flic Film.
The results up to the 8-roll capacity limit are essentially the same, and it’s possible to get 12, or even 24 rolls out of a single kit — though you’ll need to increase the development time by 2% per roll to achieve it.
Are blix film development kits good?
There is a prevailing myth out there that blix isn’t as good as a separate bleach and fix formula that labs use. The reason is because blix breaks down faster than the separated formulas and there’s no way to replenish it.
The truth is blix is just as good as separated bleach and fixer if you use a water bath between the dev and blix steps. One or two rinses of the developing tank will be enough to remove most of the developer.
The reason blix doesn’t produce lower-quality negatives than separated formulas is because it doesn’t alter the color or look of film — unless you want to do a bleach bypass.
Blix simply combines two steps that remove silver from color film. Fixer removes undeveloped silver, while bleach removes the developed silver, leaving the color dyes behind.
Neither one of these steps really affects the look of the film in the long run — you’ll have good-looking negatives so long as all of the silver is removed.
How to get the best results with blix
Blix is fantastic for increasing the speed of processing film. But there are a few drawbacks to be aware of.
Problems usually arise from using the blix as a stop bath. The developer is alkaline, while the blix is a slightly acidic formula sitting at the pH edges of usefulness for bleach and fix. So the blix will lose effectiveness as that acid is neutralized by leftover developer.
But you can solve this problem by doing a simple rinse between the developer and the blix. If a bit of water gets in the blix, it won’t be a problem. pH is measured logarithmically, meaning you’d need to dilute the solution by over 10x its volume to reduce acidity. The ounce of water left over in the bottom isn’t going to cause any problems.
Most pros have been using a water bath between dev and blix for ages to maintain the capacity — even though the instructions in the kits tend to advise users to simply use the blix immediately after the developer.
The next downside of blix (and this is true with any kit — not just Cinestill) is that it does take away some control from the user. in The main process that these kits don’t allow film photographers to do is a bleach bypass — though you can do a bleach bypass by simply purchasing regular Ilford or neutral fixer to use instead of the blix.
How to extend the capacity of the Cinestill CS41 Developing Kit
Getting just 8 full rolls of film doesn’t always feel like enough with one of these kits. That’s just enough to save a couple of dollars per roll at the lab (not including scanning, of course). But if you extend it, you can save much more money overall.
I’ve personally developed 16 rolls (double the rated capacity) with one of these kits, and haven’t noticed much, if any, decline in the quality of the results.
- Use distilled or demineralized water to mix the kit.
- Keep the chemicals in glass, air-tight containers filled to the top.
- Use precise temperature control with a water bath and inversion circulator (also known as a sous vide).
- Use the kit within 1 month (the chemicals will degrade in water fairly quick)
- Add 2% to the developing time per roll of film. So if the original time is 3:30, multiply 3.5 x 1.16 after developing 8 rolls, to get a developing time of just over 4 and 3 seconds. By 16 rolls, that original 3:30-minute developing time will increase to 4:37 minutes.
Using those tips, you should be able to increase the developer’s capacity. Of course, the developer and results will still degrade even if you use these tips perfectly — in the end, it’s up to you whether or not the results are still good enough. Learn about these tips in a more in-depth article on extending the capacity of color-developing kits here.
I always recommend developing your most important rolls in a batch first, that way you can guarantee the best possible results.

Final thoughts
The Cinestill CS41 color developing kits are well worth their cost. If you’re able to juggle two Paterson Developing Tanks, you’ll easily be able to use up the entire rated capacity within 2 to 3 hours of opening the box.
In fact, once you have the temperature under control, using this kit is much faster and simpler than developing black and white film.
I’ve used these kits and their clones for the last two years, and have always come out with consistently good negatives, even though I’ve heard from many people that a blix kit will never be as good as a separated bleach/fix formula.
And in an age of rising costs everywhere, it’s awesome to see that companies like Cinestill and Arista are helping users save money by developing film at home. I highly recommend these kits because of their convenience, ease of use, and the awesome results they give.
Find the Cinestill CS41 kit on Amazon here, or on Adorama, where you can also save money on film pro packs. Using these links really helps the blog out, as they give us a small commission on any sales made without costing the customer anything.
And that’s all for this review! If you liked this one, or would like to see more reviews and tips on film photography, check out the LearnFilm.Photography YouTube channel, where we’re giving a ton of tips and tricks to help make film photography more accessible for everyone. You can also connect with us on our growing Facebook page, Instagram, and now Grainery.app! And if you’re interested in helping us on another level, you can purchase prints here.

By Daren
Daren is a journalist and wedding photographer based in Vancouver, B.C. He’s been taking personal and professional photos on film since 2017 and began developing and printing his own photos after wanting more control than what local labs could offer. Discover his newest publications at Soft Grain Books, or check out the print shop.