
Developing film yourself is meaningless if you can’t see your results. It’s fun to shoot, and cool to develop. But scanning them is the only way to prove that you’re actually a film photographer. If you’re getting started down that journey, chances are you’ve looked up the Epson V550 or V600.
These two are cheap, sitting around the $300 mark, and they’re basically the only options that are still being made. But with the pandemic in full swing, even a year later they’re becoming hard to come by. I had the V550 for a couple years, and upgraded to the V600 this year after moving across the country and not wanting to ship a giant, heavy, breakable machine.
Through the pandemic alone, I’ve scanned more than 1,000 images with this machine and have had some pretty damn cool results. I’ve used multiple types of software, from the stock Epson, to Silverfast, and even just scanning the negatives as positives and converting them in Negative Lab Pro. I’ve become an expert on its use, and have learned how to easily tweak images to my liking.
But the process of scanning with a flatbed is slow. So I’ve also recently tried out using my DSLR camera with some extension tubes and an LED panel for a backlight. This process requires a lot more tinkering than scanning with a flatbed, but so far the results have been astounding! More on that below.

Should I buy the Epson V550 or the V600?
I’ve scanned well over a thousand photos using the V550 and V600. Before moving across the country, the V550 was my primary scanning rig for two straight years. I would spend hours developing then scanning film negatives. Being able to see my negatives as digital images kept me loving the whole film photography process.
I’m a professional photographer and photo editor, so working with digital files by day left me longing for the magic of film at night. There’s nothing like going to a physical medium where your every touch has an impact on the final result. Digital feels cold and boring in comparison.
The only major difference between the Epson V550 and V600 is the ability to use Digital ICE on prints in the V600 scanner. This is a piece of software the automatically removes dust and scratches on your negatives. It does a good job of removing most pieces. But I’ve always preferred to use Photoshop when there’s dust over something detailed in an image, like a face.
Other than the additional use of Digital ICE, I have found no difference in image quality between the V550 and the V600. Personally, if the V550 was available in the region where I moved, I would have picked that scanner up and saved the $30 or $50 difference. If you have the chance to pick up a V550 on the used marketplace, I’d go for it every day. If you’re looking for something new, then the Epson V600 is a great choice for any film photographer.
Is scanning with a digital camera easy?
When I moved across the country, I had a really good opportunity to try out a different scanning rig. I searched the Internet for months looking for something other than a flatbed scanner to see if I could get some results. Facebook is full of groups with great advice on the subject, but there’s no such thing as a budget, one-size-fits-all solution when it comes to DSLR scanning.
The first thing I bought was a set of metal extension tubes and an LED Light tracing table. These two items are some of the best purchases I’ve made because they’re multi-functional. The light table is perfect for viewing and cutting negatives — especially difficult ones, like underexposed shots where there isn’t always a border. And the extension tubes let me use my ridiculously sharp Sigma Art 35 f1.4 and insanely high-performing Sony A7III to photograph the negatives extremely close. I now use these extension tubes all the time for product photoshoots and ring shots for my wedding work.
I also purchased Lomography’s Digitaliza film holders for 35mm and 120 films. Since I no longer had the film holders from the Epson scanner, these seemed like a promising bet. Many people on the Internet had suggested that they would work, and they looked and felt like good quality tools. As far as my reading went, that should have been enough to get started.

What problems did I run into the first time I scanned with a DSLR?
The first problem was that I couldn’t align my camera perfectly with the film. I was using a tripod, but it was a video tripod, so I couldn’t point it straight down. Instead, I tried jerry-rigging it with some friction arms. As useful as they are in every other situation, it took at least 30 minutes to set up, and I could never get the camera in perfect alignment with the negative.
The issue here is that the focus plane diminishes rapidly when you move closer to your subject, like when taking photos of insects or negatives. So if it wasn’t perfect, half of the shot would be frustratingly out of focus, and the other half would be alright. Not exactly a perfect situation.
The next issue came from the film holders. The reason I didn’t link to them is because they use two magnetic plates to hold the film when you clamp it together. But there was just enough space for the plates to move that it scratched my negatives. I quickly stopped using those and tried to scan the negatives on the LED panel without a holder. But even though my lens is really good at reducing flaring, there was still enough to make sections of the film look blurry and out of focus. I got through four rolls before I realized that flaring completely ruined the photos.
So I immediately returned everything, except the panel and extension tubes, and bought an Epson V600.

What brought me back to scanning with a digital camera?
The V600 is an amazing piece of technology. It’s simple to use, and it makes good images. But it’s slow. Scanning 10 rolls of 645 negatives will take an entire day. The file sizes are also massive, reaching anywhere from 50 megabytes to 1 gigabyte in the largest format. But that 1gb file size isn’t necessarily more detailed than the 50 megabyte version. The scanner can resample the images to a physically larger size (up to 6400dpi), but it cannot extract more detail than 1600dpi. That means the larger sizes are just taking up more space on your computer instead of giving you better negatives.
As well, it’s difficult to make any two negatives look alike. You can’t use the same settings from negative to negative, so you’re stuck using curves and other adjustments to get the look you’re going for. At best, it’s really useful for perfectly tuning an image. At worst, each shot looks like it came from a completely different scene even if they were shot moments apart.
So having a desire to increase the speed of my workflow and get better results, I went back to scanning with a DSLR. I bought a new Manfrotto tripod with a horizontal center column so that I can shoot straight down perfectly without fiddling around with a couple friction arms. I also had the Epson film holders, which do a good job of holding the film straight. I also found a way to block the light around the negatives so that it doesn’t flare over the image.
Is scanning with a DSLR better than using a flatbed scanner?
I ran the same roll through both my Epson V600 and my DSLR scanning setup, and I came to a few stark conclusions.
- Scanning with a DSLR does not save any time compared with a flatbed scanner.
- Scanning with the Epson is much easier, but the quality isn’t as good.
- DSLR scanning is more expensive if you don’t already have the right equipment
- Raw files are smaller, but are much easier to edit than Epson Tifs
For this session, I used my Sigma 35mm f1.8 Art lens and 26mm of extension tubes. This let me use the middle part of the lens (the sharpest part) to take the photos. I cropped the photos down to about 50% of the original size, and the image quality was still much sharper than the Epson scanner in the middle of the frame.
The other factor is colour. When I scan with my DSLR, the images actually feel like they were created on film. Using the scanner, I was never sure if the resulting colours came from the film or the scanner. Of course, there is a major difference in colour when there’s a roll of Portra in the Zenza Bronica ETRS and Kodak Gold 200 pushed one-stop, taken with my Harman Reusable Camera. But that difference is still less apparent with my Epson V600 than it is with my Sony A7III.
I also found that the Epson scanner picks up more dust. It’s hard to know if that dust is on the scanner or the negatives, which themselves seem like a dust magnet. But no matter what, I have to clean the scanner before every use. Sometimes, a piece of dust can get in the wrong place and produce a thin, but solid colour line across the negative. This is quick to fix in Photoshop, but it’s annoying to see.
My mirrorless DSLR is also prone to getting tons of dust on the sensor. Under normal circumstances, it’s not so bad. But photographing up close does make the dust far more apparent in the resulting images. And cleaning a digital sensor is a much scarier proposition — getting a scratch there can completely ruin a $2500 camera. No matter which solution you go with, dust is going to be an issue.
But to get here, I spent $500 on a tripod, ~$40 on extension tubes, and ~$45 on the LED Light Table and a few other knick-knacks along the way. But I still don’t have a perfect setup. To do this right, eventually, I’ll have to spend another $500+ on a dedicated macro lens to have that perfect corner to corner sharpness on the resulting digital files.
What’s the difference between using a macro lens and a lens with extension tubes?
The difference between a macro lens and a regular lens with extension tubes is that the macro lens has a completely flat focal plane, whereas a regular lens does not. When you’re photographing up closer than expected, the curvature of that focal plane is exaggerated, and can reduce the corner sharpness of your negatives. If that’s something that bothers you, then a macro lens will create better results in the long run. So far, because I’m cropping the photos in I don’t see any significant degradation in image quality. Take a look at this comparison below showing the difference in corner sharpness using extension tubes and a macro lens.


Taking a look at this image above, you can see a few different issues. The Extension Tubes with 35mm lens is zoomed in 300% on the left, and the image with the macro lens zoomed in the same amount on the right. Both images with shot at f/9 and ISO 50. The corners in the image on the left are not nearly as sharp as they are in the image with the macro lens — the details and grains are both quite blurry, but are sharp in the image on the right. Even the Epson scanner was much sharper in the corners than the image with the extension tubes.

The chromatic aberration shows in both images and is due to the Harman Reusable camera’s cheap plastic lens. Both of these lenses had much better ISO performance than the Epson scan. Although the Epson scan was sharper in the corner than the image shot with the 35mm lens and extension tubes.
I also had a problem Newton rings when using the 35mm lens and extension tubes. These were only apparent in thinner, underexposed negatives taken at night time. When I lifted the highlights and shadows, the images showed symmetrical light and dark patterns throughout the negative. In the images shown below, the Newton Rings are very apparent, and do ruin the image. But I was able to get rid of them using the Canon 100mm f2.8 macro lens and a light diffuser from a video light. If you don’t have one around, a sheet of Wax Paper should do the job, although you may have to reduce your shutter speed or increase the ISO to overcome the reduced light.


The decision to use a macro lens or extension tubes is going to be different for every person. If you already own a macro lens and a high megapixel camera, the decision is made for you. These lenses are extremely sharp, and the flat focal plane allows you to capture every last grain perfectly onto your camera’s sensor. But if you don’t, even old, middle of the pack macro lenses will cost a minimum of $500!
If you have a long, sharp prime lens, the extension tubes will make usable results. It may require some cropping depending on the aperture you use and the type of lens, but this won’t seriously degrade image quality. Even modern, middle of the pack cameras like the Canon 80D will provide excellent results even if you have to crop slightly. Of course, you’ll be able to print the images larger with a better macro lens. With my camera, I can safely print an image up to 24×26 without losing any quality. But those prints are so few and far between, that it shouldn’t even be a consideration for the vast majority of film shooters who just want to post on Instagram and maybe print some 8x10s. In fact, if there is an image that you’d like to print that large, it’s likely that you’ll want to pay for a drum scan or a higher-quality scan from a professional lab anyways.


Should I buy a flatbed scanner, or go for DSLR scanning?
If you already have some of the equipment for DSLR scanning, you’re going to get better results in the long run. But if you’re just starting out and are looking for a cheap, easy option to get good quality results, then the Epson V550 or V600 is definitely the way to go. In fact, most of the images on this blog, from the home page this article were scanned with the V600. The results speak for themselves.
DSLR film scanning will not save time. When you’re taking the photos with a DSLR, capturing the photos is faster. But converting them in Negative Lab Pro, cropping, and adjusting the photos takes the same amount of time as doing it in the Epson scanning app. The biggest difference is the Epson app will give you 5-10 minutes when you’re scanning the negatives to go do something else, like writing this article or doing the dishes. The DSLR scanning is a completely hands-on process with no downtime.
Scanning with a DSLR camera will cost more money. An Epson V600 costs ~$250 on Amazon, which pales in comparison to the cost of a DSLR camera + macro lens + tripod or copy stand and the other required extras. For the results that these scanners get, it’s pretty astounding that they’re still so cheap. You can blow up the images to amazing sizes and get some pretty astounding results in Lightroom and Photoshop. They’re also extremely reliable machines, and will hold their value for a long time to come. Even though I bought my V550 for $250, I was able to sell it used for $200. That’s not bad value considering I used it steadily for a year straight.
But, the DSLR is sharper and has better colour reproduction than a flatbed scanner. This is a really important factor to a lot of people. When I take a photo with my DSLR, I can actually see the grains in an image. To a degree it’s possible to see that with a film scanner, but the grains look patchy and washed out in comparison. Even on the out of focus sections of an image, the grains look better when scanning with a DSLR. The Harman reusable camera does not take sharp photos, full stop. But the images scanned with the A7III feel more real, and true to life than the Epson versions.
What setup do I need for DSLR scanning?
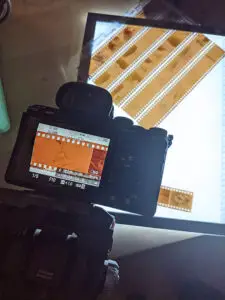
Here’s what you’ll need to get into DSLR scanning. This is my current setup. It requires a bit of tinkering to get everything working perfectly. But when it does, the results are pure magic.
- A decent APS-C or Full Frame camera. I recommend the Sony A7III because of its small size, adaptability, high-resolution, and the stunning quality of images it takes. I’ve used this camera for two years, and the features on it still continue to blow me away from when I was using a Canon 5DmkIII. That said, any modern camera will do a really good job at scanning negatives.
- A macro lens, or a sharp lens with extension tubes. Extension tubes are not the best option, but they’ll work until you’re able to upgrade to a full macro lens. Modern macro lenses handle flare better, and are able to create almost perfectly-flat focal planes corner to corner. In the end, you will likely have to upgrade to a dedicated macro lens to get the best results with DSLR scanning.
- A light source. I’ve seen people use window light, a flash, or even old iPads. I’m personally using this video LED light with excellent results. So long as you’re able to keep the camera and negatives steady, any good light source will will. I however, cannot recommend using the cheap LED tracing tables found on Amazon. They simply don’t give an even exposure across the pad.
- A way to hold your camera perfectly aligned with the negatives. This is the most important piece. Because if you can’t be perfectly aligned, you’re not going to get sharp results. I use a Manfrotto tripod with a horizontal column. Manfrotto is an internationally recognized tripod manufacturer for their workmanship. This tripod offers incredible stability and the horizontal arm is perfectly positioned for this exact process. I can’t think of a better purchase for this price.
- Some way to hold your negatives and block the surrounding light. If you don’t block the light, there will be flaring on your negatives. This will reduce the sharpness and change the colors dramatically. I’ve seen people use everything from custom 3D printed designs, like the Essential Film Holder (which I personally use) to toilet paper rolls with good success.
Disclosure Statement: Some links on this blog post are affiliate links, which means that I receive a small commission on any sale resulting in those links clicked. This does not affect the prices of the items for sale, but it does help me continue blogging. All of these items are ones that I have used and bought with my own money. None of these items were gifted to me for the intended purpose of advertising.

By Daren
Daren is a journalist and wedding photographer based in Vancouver, B.C. He’s been taking personal and professional photos on film since 2017 and began developing and printing his own photos after wanting more control than what local labs could offer. Discover his newest publications at Soft Grain Books, or check out the print shop.
This is my DSLR scanner that I made 15-16 years ago.
https://www.flickr.com/photos/carter3john/2860872771/in/album-72157602669949797/
I got tired of running from one room to another with the chip so I bought a V500.
Recently, I brought it back to life to see how it worked; the first is from the V500 and the second image my DSLR scanner, and the third is full frame image.
https://www.flickr.com/photos/carter3john/50413257311/in/dateposted-public/
https://www.flickr.com/photos/carter3john/50413412947/in/dateposted-public/
https://www.flickr.com/photos/carter3john/50413413717/in/dateposted-public/
It’s amazing how much clearer those DSLR scans can be. I love seeing the grains in an image like that — it’s just something the flatbed scanners can’t seem to compete with. And how did you build that rig? Do you find it’s easy to adjust the negatives when they’re being scanned vertically like that?
Vertical DSLR scanning is not a problem. The nice thing about this set-up is it is always ready to go no tripod, no messing with bubble levels, no problems with light piping, but the transfer is time consuming. The bellows unit is a Pentax Slide Copier which will also take negatives. I’m pretty sure I could do better with this unit now, I just put the DSLR scanner on a bed to try it out. My mirrorless is old and has to be focused on the screen. I did not bother with pixel peaking which would get better critical focus.
I designed it as I built it which was Plexiglass cut by a local distributor.
First was a solid enlarger lense that should be a fraction of a 90mm 1:1 macro. And the quality of light in the LED light panel matters. A bad led can turn res rocks into green ones. Bellows from the film day can be had with a film slide holder and some extra tubes and you’re good to go. Better than nikon 4000 coolscan.
Interesting how my comment proving this article wrong won’t post for some mysterious reason.
Hi Chris,
Sorry to hear you’re running into issues posting comments. I assure you that’s not the reason why your comment hasn’t been posted — I am fully open to any critiques of any articles posted on this blog. I believe all feedback will help improve the quality of the information for anyone to see. Now that this comment was approved, it should allow you to post any other comment on this blog. Please try once again.