When I first started scanning film with my DSLR, I wanted to save money any way I possibly could. I didn’t have a dedicated macro lens, and my current setup at the time was far from being ideal for film scanning, needing around $1000 minimum in upgrades to get the right equipment for the job.
So I started out by using a $30 set of extension tubes and a Sigma Art 35mm lens to get as close as possible to the negatives. But I recently upgraded to a Sigma Art 70mm macro (the most recommended lens for scanning film and Polaroids) to test just how much better macro lenses are for DSLR scanning. But to start, is it possible to scan film using extension tubes instead of a macro lens?
As a general rule, scanning film with extension tubes is not ideal. Standard lenses are not designed to produce a flat focal plane when focusing a macro distances, and don’t handle flare as well as dedicated macro lenses. That said, acceptable results can be created using extension tubes.
In this article, we’re going to zoom in on one of my negatives to see the real world difference between shooting with extension tubes and a macro lens. I chose the image that I did because it’s full of unique textures and has a surprising amount of life in it. Unfortunately, it is a vertical image. But this is one that has captivated me for a while now. I took it using a Pentax S3 and a 300mm f/6.3 lens at around f/8.
The extension tube vs. macro lens shootout setup
To make sure everything is on equal footing, I’ll first show you the setup so that you can see just how scientific this test was. There is obviously some room for improvement, but in general, the test is as solid as I could make it with my current setup. If you want to skip this section and get to the actual comparison, click this link to jump to the results in the next section.
I used my Sony A7III, at ISO 50, f/8, and a 6 second exposure time set up with a 5-second timer so that I didn’t touch the negatives. In both cases, I got as close as possible to the negative so that I wouldn’t be sacrificing that much detail from cropping. In the end, some cropping is unavoidable. But extension tubes get you as close as a non-macro lens will allow. Using a camera like this isn’t necessary, but the extended dynamic range, and the incredible quality that comes out of using ISO 50 make for some very flexible scans. If you decide to purchase this camera, using this affiliate link on Amazon helps me feed my growing family.
Sigma Art 35mm f/1.8. This was at one point known to be one of the sharpest lenses on the market. I chose this one because of its legendary sharpness, and the fact that wider lenses allow you to get up closer to the action than telephoto lenses, while having a moderately larger depth of field.
Sigma Art 70mm f/2.8 macro. This lens has been immensely useful for scanning negatives, as well as for weddings, product photography, and so much more. It’s incredibly sharp corner to corner even when scanning 120 film or Polaroids, and has coatings that substantially reduce glare. This lens is so good, it often out-resolves lenses that cost twice as much, and is almost on par with other lenses that cost 10x as much! Find it for the best price on Amazon here.
iPad as a light source. After speaking with Nate, the founder of Negative Lab Pro, I went on a deep dive looking for a better lightsource that what I was using before. The iPad was one of the ones suggested on the Negative Lab Pro website, so I thought I’d give it a go. The light isn’t as strong as some of the better ones, but because it’s a direct light source, it provides much sharper results than using a side-lit cheap light table on Amazon. Find my comparison between those two light sources in this article.
Negative Lab Pro. This is the de-facto conversion software in the film photography community. It’s by far the fastest way to convert negatives, and is built into Lightroom classic. Negative Lab Pro makes it easy to batch edit negatives and catalog them using an efficient workflow.
Learn more about the best equipment setup for scanning film with a digital camera here.
So now that the gear is out of the way, let’s get into the real comparisons.

Overall sharpness
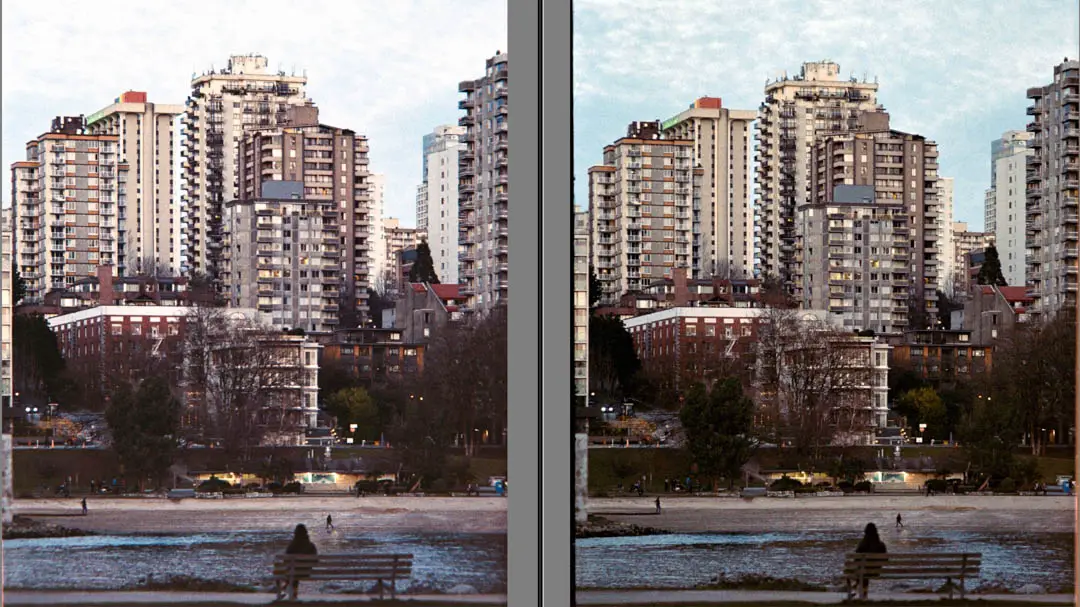
Looking at the image when it’s fit across my 4k computer screen, the two images look almost exactly the same. There is little difference between the two scans, although the image scanned with the extension tube on the left is a little brighter and less detailed in the highlights. Looking at the top of the image on the top of this article, it’s clear to see how the scan with the macro lens better controlled the highlights in the image.
Both scans were taken using the same settings (ISO 50, f/8, 6 second exposure), but it is possible that f/8 on the 35mm with extension tubes is darker than f/8 on the macro lens. But even darkening the extension tube scan image does not bring back more detail.
And that’s the case throughout the negative. When you zoom in to 300 or 400% (like on the image above), it’s clear that the image scanned using the macro lens on the right is far sharper than the image scanned using the extension tubes on the left. The fine details, like the white beam on the red roof, is thinner, the textures are finer, and there are more grains present throughout the negative image shot with the macro lens.
Overall, the image taken with the macro lens is noticeably sharper. And because of the extra fine detail that it’s able to capture, the images are more malleable in post production. I can make far more adjustments when I scan with a macro lens, like pulling down the highlights to reveal the clouds, than I can when scanning with the extension tubes.
And this might be for a couple of reasons. One, the 35mm lens with extension tubes will not create a perfectly flat focal plane. That means the edges of the focus will curl backwards, even when shooting at a small aperture like f/8. Since the sky was close to the edge of the frame, it is likely that that’s where the focal plane begins to bend.
You can also see this focal plane bloats the image in the center, where the details are wider than they are on the corners and edges of the frame.

Corner sharpness and chromatic aberration
This part of the test is similar to the last test, but this time I moved into the top right corner to look for less sharpness, and some other defects. I had to zoom in 400% to see this view. And to be fair to the image, I had to cherry pick this corner because it showed the chromatic aberration at its worst.
At this level, I can’t even say the chromatic aberration is all that bad. At f/8, it’s well enough controlled that it isn’t even visible until zooming in to this magnitude. And we can tell the aberration doesn’t come from the lens (which is the most likely cause, considering it’s from the 60s), because it doesn’t exist on the image scanned with the macro lens.
The real concern with the extension tube scan is the lack of detail in certain parts of the highlights next to the balcony. There are white areas without any texture from the grain, meaning that there were no details captured in that area.

Colors, saturation, and contrast
This section is the most interesting to me. When looking at the image scanned with the macro lens on the right, there is a more clear separation of colors, blacks, and whites than are visible in the image scanned with the extension tubes on the left.
The colors are also a bit different, with the image scanned using the extension tubes on the left looks overall magenta, and lacks detail in the shading that is shown in the image on the right.
This comparison was captured in the bottom middle left of the image. That extra tonal separation is another factor that makes a big difference when editing film images. Even from a distance, the details in these sections along the beach contain far more details in the macro lens scan than on the right.
Final thoughts
There are some clear downsides to using the extension tubes when scanning film. But at the end of the day, it’s entirely possible to get usable images. If I didn’t see the version scanned with the macro lens, the version taken with the extension tubes would be perfectly passable. Especially when you’re not pixel peeping on the image. To see the downsides, I had to zoom in to 400% in some cases, and even then they weren’t all that apparent.
But, it’s important to note that the Sigma Art 35mm f/1.4 is one of the sharpest prime lenses ever made, yet even this lens cannot come close to the quality of scan made from a macro lens that costs half as much new. Normal, non-macro lenses will not produce results that are even as good as an Epson V600 since they do not create a perfectly flat focal plan.
At the end of the day, upgrading to a macro lens is a very personal choice. There are options out there that are fairly affordable. For instance, the Sigma Art 70mm Macro is one of the best priced macro lenses on the market, and it’s an exceptionally sharp lens that often out-performs much more expensive macro lenses.
Have you tried scanning film with a non-macro lens? If so, how did the images turn out for you? Let me know down in the comments below, or send me a message on the official LearnFilm.Photography Facebook Group! And if you like reviews like this, and want to support the blog, the best way you can do that is by taking a look at our print shop. That way, you can support us and get something in return!

By Daren
Daren is a journalist and wedding photographer based in Vancouver, B.C. He’s been taking personal and professional photos on film since 2017 and began developing and printing his own photos after wanting more control than what local labs could offer. Discover his newest publications at Soft Grain Books, or check out the print shop.
Nice article, but what about close-up lenses?
Do you mean the lenses that sit on the filter threads of your lens? I haven’t used them before, but from what I’ve read, they typically produce a lot of chromatic aberrations and don’t produce the sharpest results. That’s something I can certainly add to this article, though!
Very nice article! I have the A7iii as well and have been using classic macros like the Canon FD 50mm 3.5 and the Minolta MC Macro Rokkor QF 50mm F/3.5. I’m getting great results on most scans. Images with snow can be difficult to get right. I’ve been wondering if the newer optics and coatings of a Sigma or Sony macro lens would give even better results?
Thank you! The newer lenses will definitely get your sharper results when you get closer to the negatives — there’s less of a sharpness reduction at the corners with the modern macros. But when it’s a difficult scan, like a snowy image, you’re still going to see some reflections if the negative isn’t perfectly masked off. But the flar control is still much better, I’ve only had a couple of negatives that gave me trouble since upgrading my kit.
The Sony lens may be a bit overkill for scanning negatives, but the Sigma Art 70mm does an incredible job. Though the Sony may be more usable in settings other than scanning film.
Regards,
Daren