Every film photographer is going to be faced with this same question: should I buy a light meter? The problem is that cheap light meters are typically not as effective and expensive ones are, well, expensive. A new spot meter from Sekonic, for example, costs over $500. So is a light meter necessary for film photography?
As a general rule, light meters are necessary for studio flash photography on film, or when metering for a specific part of the frame. Most film photographers don’t need a light meter, and can create perfect exposures using the Sunny 16 rule or mobile phone applications.
Most film photographers will never need a professional, hand held light meter. In fact, in my daily photography, I’ve never found these to be more useful than the light meter I use on my phone (scroll down to see which one).
As well, older light meters may be less sensitive than they were originally. Especially selenium cell light meters — the ones that don’t require a battery — are most likely to give incorrect exposures over time. Even used battery powered light meters may be less accurate with age due to corrosion and other factors that reduce their sensitivity.
Before we see the alternatives, let’s get into the times when you will need a professional light meter.

Where a professional light meter matters the most
Having a professional hand held light meter can be really important for some photographers. There are plenty of controls and scenarios where these dedicated tools just work better.
For example, if you’re metering for flash, you’ll want a light meter like the Sekonic Flashmate. Since you can’t take test exposures on film, you’ll need something that can give you a perfect flash reading. A mobile phone app isn’t going to be able to record that split second of light, because the phone cameras aren’t built for that.
But the Sekonic Flashmate can. Simply hold the button on the side, and hit it with the flash. The Sekonic Flashmate will save the reading from that bright split second. Film photographers in the studio will always need a tool like this in their kit. Without it, they’ll simply be wasting film.
The next place where having a dedicated light meter is necessary is for large format photography. Each sheet of film can cost up to $15 a shot, (and probably more by the time this article is published). So getting the exposure right the first time is essential.
Most photographers will use a spot meter. This allows them to meter for a single, small area in their scene, like in the highlights or the shadows. By using a spot meter, you can meter multiple parts of the scene and dial in the perfect exposure that is well within the film’s dynamic range.
Most film photographers shooting large format are going to use something like the Sekonic LiteMaster Pro L-478-U. This is one of the few professional light meters that is still made. It’s far more reliable than purchasing one on the used marketplace, because you know that it’s been factory calibrated, and that the wiring is up to modern standards.
What free options exist
If you’re not shooting in a studio or with large format film, then you likely won’t need to bring one of these tools around with you. While I do know a lot of photographers who use these every shoot, I personally have found light meters to be more of a hindrance than a help.
They take up space in your bag, and are complicated to use. Since I’m not the easiest on my gear, I know for a fact that it’s just going to get abused over time. But my phone always fits in my pocket, and it has one of the best, and simplest light meters I’ve ever used.
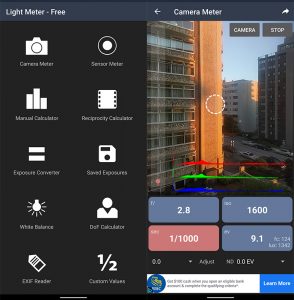
Light Meter app by WB Photo
App developer WBPhoto has had a light meter on the market for as long as I’ve been shooting film. But the latest iteration, simply called Light Meter, is the best app so far, combining multiple functions into a single, user-friendly app.
The best part about the Light Meter app by WBPhoto is that it has a built-in spot meter function. When you zoom in on your subject in the app, it will meter only for that specific portion of the image.
This app is an absolute game changer for landscape, night photography, and portrait photography, because it allows you to choose if you want to meter for the highlights or the shadows rather than the whole scene.
But the reason I use this more than any other light meter is because it’s by far the quickest method of getting a precise exposure reading. Personally, I only own one film camera that has a light meter, so this app has made getting perfect exposures much easier than ever before.
The app also has a reciprocity failure calculator and a sunny 16 calculator among other useful features. Read my full review of the Light Meter app here.
| Condition | Aperture value |
| Cloudless, snowy day | f/22 |
| Bright Full Sun | f/16 |
| Hazy Full Sun (LA, New Delhi) | f/13 |
| Midday, light clouds | f/11 |
| Midday, mostly cloudy, or subject in the shadows | f/8 |
| Overcast | f/5.6 |
| PNW/Great Britain heavy overcast | f/4 |
| Sunset/Sunrise | f/2.8 |
| Blue Hour Photos | f/2 |
| Times Square/Las Vegas Strip at Night | f/1.4 |
| Dimly Lit Bar | f/0.7 |
Use the Sunny 16 Rule
Back before light meters were a thing, people had to do some pretty crazy math to get a proper exposure. Luckily there were some nerds from the 1920s wanted everyone to be able to use film. So they came up with a simple system that everyone could use, and called it The Sunny 16 Rule.
It goes a little something like this:
On a full sun day with no haze, put set your aperture to f/16 and shoot the same shutter speed as your ISO. So if you’re shooting ISO 100 film, you’d shoot at 1/125th of a second at f/16, or 1/500th when using ISO 400 film.
Then, using the reciprocity laws, you could calculate different shutter speed and aperture combinations. So on that same sunny day, you could use an aperture value of f/11 and shoot at 1/1000th, or f/8 and 1/2000th.
On cloudy days, stop down to f/8, or f/2.8 at sunrise and sunset.
So long as you know a few of the values in the Sunny 16 rule, you can get a good exposure in almost any type of light. Learn more about using the Sunny 16 rule reliably here.
Should I bracket exposures when not using a light meter?
Bracketing exposures means taking multiple photographs with different settings to essentially hedge your bets in hopes of coming home with at least one winner.
Bracketing is a practice that many photographers do, even when they have a light meter. But it can feel like a waste of precious film. Most would prefer to get it right the first time — especially when shooting medium. There are only 8-15 photos on a medium format roll, so every shot counts.
My general rule when considering whether or not to bracket an exposure is to simply choose the lower shutter speed or larger aperture. Film is notoriously good at bringing back over-exposed details, but recovering shadows is not possible.
If I’m shooting at 1/500th of a second, then I can easily bring it down to 1/250th and still get the photo with an appropriate shutter speed. Or if I’m on a tripod, bringing it from 1/125 down to 1/60th or even 1/30th is not a big deal.
Always err on the side of overexposure and you’ll come back with good negatives. But if you’re really in doubt and have the money shot in front of you, then bracketing is always better than coming home with nothing.
That said, I would never recommend bracketing for large format photography. You only get one shot, so you have to make it count by metering correctly.
What cheap light meters exist?
Thanks to the revival in film photography, we have a number of new light meters that are hitting the market.
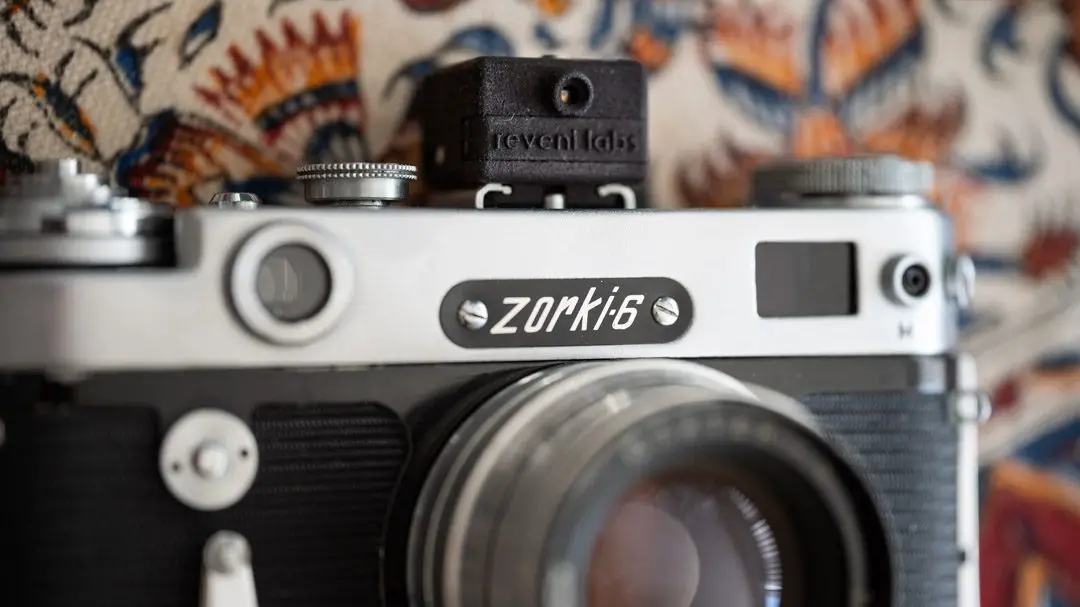
There are plenty of different camera shoe meters made by companies like Reveni labs, Doomo, TTArtisans, Hedeco, and more. These meters are fairly cheap, cool-looking, convenient. They sit in the flash shoe on top of your camera, and can give you a general exposure readout for the entire scene, but they aren’t as accurate as a spot meter or an internal meter (which gives you the read out based on your settings, or what’s visible in your viewfinder).
There is, however, one company in Canada making cheap and effective light meters. Reveni Labs in Ontario, Canada is one of the first companies to come up with a novel approach to spot metering since Sekonic. Their spot meter is tiny compared to the Sekonic, and works with bifocal vision.
The Reveni Labs spot meter also has a metering option built in where the user can meter for different parts of the image and automatically calculate the best exposure for that image, similar to using the zone system. The metering mode is built based on Nick Carver’s metering method for medium and large format photography.

By Daren
Daren is a journalist and wedding photographer based in Vancouver, B.C. He’s been taking personal and professional photos on film since 2017 and began developing and printing his own photos after wanting more control than what local labs could offer. Discover his newest publications at Soft Grain Books, or check out the print shop.