After spring cleaning this year, I had a friend who brought home an old film camera from their parent’s basement. And now that the film revolution has started, there’s a lot of people who are interested in trying out the medium for the first time ever. The first question my friends often ask me when they come across their first film camera, is what kind of film does this camera use?
As a general rule, any 35mm camera can use any 35mm film, whether it’s color or black and white. Medium Format cameras require 120 film, and pocket 110 cameras will need to use 110 cartridge films. Some cameras may require a certain ISO speed to create a proper exposure.
In most cases, you can put any film into your camera — whether it’s black and white or color — and you’ll get great results so long as the camera is working and the film hasn’t expired. More on that below. First, let’s get into the cameras that are limited to specific films.
Can you put 120 film in 35mm cameras, or 35mm in 120 cameras?
I see this one coming up a lot in Google Search, and the short answer is no, you cannot put 120 film (a.k.a. medium format) in a 35mm camera. A roll of 120 film is almost as large as most 35mm cameras are themselves.
But, if you buy the right film holder (like this one on Amazon), it is possible to put a 35mm film into a 120 camera. Many photographers even love experimenting with 35mm film in medium format cameras, because it creates panoramic images with exposed sprocket holes.
These images may be tough to line up in the viewfinder since it’s hard to know exactly where will be exposed and where won’t be. And most medium format cameras move the film top to bottom, meaning you’ll have to turn them sideways to create a horizontal image rather than a vertical one. But overall, experimenting this way can be a ton of fun, and it’s extremely cheap to try out — so what’s stopping you?
Which cameras have limited film selection?
The only time when you are limited in your film selection is if you’re shooting with a reusable camera (or toy) camera.
Reusable cameras are a new type of camera on the market that is a response to the resurgence of disposable camera popularity. Disposable cameras are a huge waste of plastic, but people love the look and feel that they create. So manufacturers like Ilford, Lomography, Adox, and Yashica have started producing reusable cameras to reduce waste.
Subscribers are also reading:
1. 9 Important tips for new film photographers
In fact, I recently completed my review of the Ilford Sprite 35-II, and it’s honestly one of the most fun cameras on my shelf. Learn more about this camera in my review here.
Since the reusable cameras are limited to a single shutter speed and aperture, they’re limited to films that are 400 ISO. They can typically still get away with using cheaper films like Kodak Gold 200 or Fuji Superia 200 in bright daylight, but these films will lose a lot of shadow detail around late sunset and after dark.
Toy cameras are also limited in the types of film that they can use. The main toy cameras that still exist today are the Diana F+ and the Holga, both of which are being made by Lomography. Both the Holga and the Diana cameras require 400 speed 120 film for medium format cameras. Some Diana cameras are made for 35mm film to give users more flexibility.
Otherwise, any camera that has adjustable settings will be able to use any film in its format.
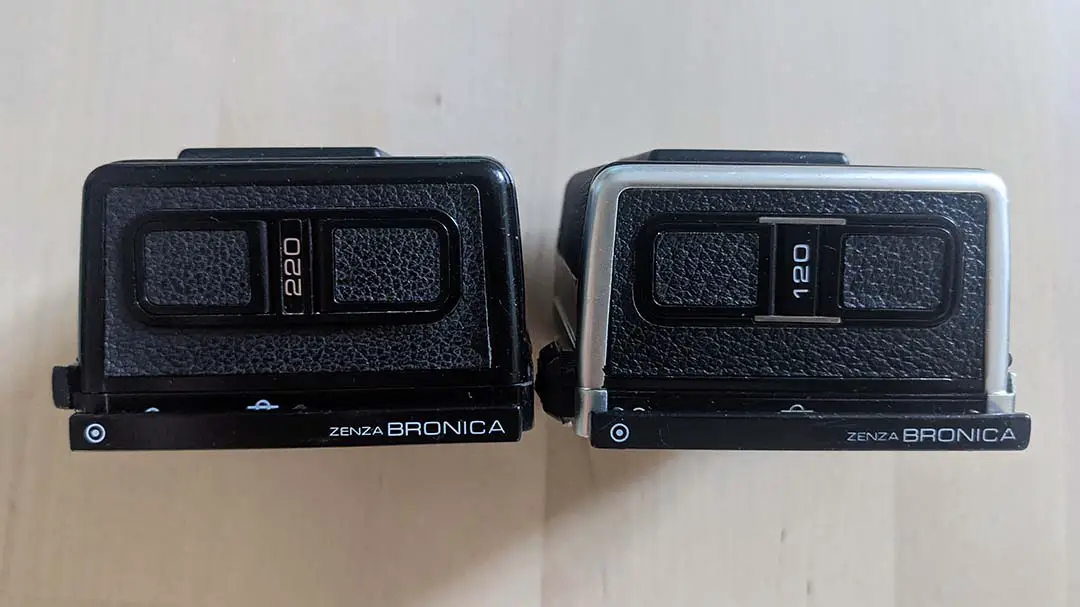
Can I put 120 film in a 220 film back?
Medium format photographers used to have two different types of rolls — 120 and 220. 220 films used to capture twice as many frames as 120 film, meaning a photographer could get up to 24 6×6 shots on a single roll of medium format film. The rolls were approximately the same size because the 220 rolls removed the backing paper that is used to stop halation in medium format film.
Most system cameras, like Hasselblad 500 series and, Mamiya, Pentax, and Zenza Bronica cameras all had different backs that were designed for either 120 film or 220 film. Since 220 film is no longer made, these backs can often be found for a bargain compared to the 120 backs.
While a roll of 120 film will fit inside a 220 film back, it will not function exactly the same. For example, in a Hasselblad A24 back, the photographer will only be able to capture 11 frames instead of the usual 12. TLR cameras like the Yashica Mat 124 and Rolleiflexes can accept either 120 or 220 film by changing the placement of the pressure plate inside the camera.
As a general rule, it is important to read up on the individual cameras before purchasing a back with an improper format. Some 220 backs will function just fine with 120 film, but the frames may not line up perfectly with the start or end of the roll. You will also have to keep watch of the frame counter so that you don’t miss any shots after the 12th frame.
How do I test if a camera is working?

There are a couple of tests that you can do to test if a camera is working. But to really know how it’s doing, you’ll have to run a roll of film through it. So how do you tell if the camera is working?
The best way is to open the camera back, cock the shutter using the lever on the top right, and then press the shutter release button. Most older film cameras will be able to release the shutter without a battery, but new ones might need one to operate. It usually depends on how advanced the system is.
If the shutter doesn’t release, then it’s likely stuck and will need to go in for repair to get it working again. In most cases, it’s just a bit gunked up and will just need a routine CLA, otherwise known as a Clean, Lubricate, and Adjust. Most cameras should undergo a service like this every 10 years or so.
If the shutter releases, the next step is to test the different shutter speeds if the camera has them. Check to make sure they sound okay, and that the shutter curtain doesn’t get too slow or stuck along the frame. Older cameras typically have slightly inaccurate timings when shooting slower than 1/50 of a second. If you notice the camera stays open too long, send it in for a CLA.
Then, using the flashlight on your phone, check to make sure the camera still has some kind of light sealing around the back of the camera where the backing plate meets the camera body. These seals will be a black foam, and if they’re too small, or if there’s some mold or exposed metal, then you’ll know there’s an issue.
These seals stop light from getting in the camera and exposing your film. If there’s none there, then pick up a kit (like this one on Amazon), or send it off to the technician to add some in — this is usually a very quick and cheap process.
The last test is to check the lens aperture. Try opening and closing it. If it’s tough to move, or if you notice oil on the aperture blades, it should be sent to a technician for cleaning. Lenses with oil on the blades that don’t get cleaned might find that the aperture blades get stuck in a single position over time. And that’s much harder to fix than a simple cleaning.
The film test
If everything looked alright from the top, then you’re ready to run a roll of film through the camera!
I typically use the cheapest film I can find for this. In North America, typically the cheapest roll of film available is Kentmere 100. But since that film is black and white, it can cost more money to develop than a cheap color roll, like Kodak Gold. Take both processes into consideration and choose the cheapest option from there.
This is when you’ll really know if the camera works or not. Make sure to shoot the roll of film over the course of 24 hours. That way you can get the camera at different times of day, but also have a good test for light leaks. Some leaks are slow, and take time to really become apparent on the film. So it’s best to use the camera over a variety of conditions to make sure it’s in full working order.
Here’s how to solve the 17 most common problems you might run into when picking up a new film camera.
How do I choose the right exposure settings?

Metering your photographs is likely the hardest part of film photography. Most cameras come with a built-in light meter, but only some of them still work. There are a few main types of built-in light meters. selenium cell meters, which work without a battery, and meters that require a battery to operate. In most cases, the selenium cell meters are no longer going to work properly, as they lose sensitivity with age.
This is a big reason why Reveni Labs exists. They’ve recently come out with a few different light meters designed for use with older film cameras. His new meters are tiny, inexpensive, and extremely accurate. Check out the interview I did with the founder here.
The battery-operated ones tend to be fairly reliable, so long as you can find the right battery for them. Some light meters used battery technologies that have become outdated, either due to better technology, or environmental concerns over the materials used. If you can find a modern substitute, test the light meter against a light meter app on your cell phone. There are plenty of free applications available.
My personal favorite app is called ‘Light Meter’ by WBPhoto. This light meter uses a spot meter to accurately choose the right shutter speed or aperture for your scene.
Most in-camera light meters will tell you the proper shutter speed to use with the available light. Set your desired aperture first, and the camera will tell you what shutter speed is best.
Are cell phone light meters accurate?
Most phone meters are very accurate. In fact, mobile light meters are most likely more accurate than any standard light meter found in collections of old cameras. Issues with metering on a phone are actually more likely caused by user error than the application failing to read the scene.
However, every mobile light meter is different, and many of them are styled to look like classic light meters — even if it’s not as useful as taking a more modern approach. The best way to find a good one is to test multiple applications and see which one works the best for your needs.

What’s the best roll of film for a beginner film photographer?
The best films for beginners are usually the cheapest rolls. Quite often, things are going to get messed up at the beginning stages of film photography. So it’s often way nicer to lose a $5 roll of Kodak Gold than it is to lost a $15 roll of Portra 400.
But in my experience, Kodak Gold is an incredible film. It has really nice saturation, and captures skin tones wonderfully. It’s especially good at sunset and sunrise, when the warm yellow glow really makes everything look wonderful.
But the other benefit of Kodak Gold is that this is a film that gets you that ‘film look’ right out of the box. It’s grainy, saturated, and produces those typical green tones in the shadows that people love.
When you’re looking for B&W film, there’s really no better place to start than with Ilford HP5. HP5 is by far the most versatile film on the market. It has great exposure latitude, and is one of the best films for pushing and pulling. Because it’s a classic grain, it’s typically far easier to work with than modern T-Grain films like Ilford Delta or Kodak TMax films. HP5 is usually the second roll that goes into my cameras — right after I make sure it’s working with a roll of Kentmere 100.
How do I develop my own film at home?
The next step after you’ve started shooting film is almost always to develop it yourself. Getting it done at a lab is a good option for many people, but it very quickly gets expensive. The best way to save a bit of extra money is to develop your own film at home. The process is quite extensive, and there’s a lot of details to cover. So I’ve written a whole guide on how to get started with a minimalist setup that can fit in any apartment here.
I’ve written a huge article on whether or not film photography is really worth it when it’s all said and done — the article looks at all of my expenses over the 2020 shooting season, from the film, to developers, to equipment purchases for scanning and everything else. It’s probably the most in-depth analysis ever done on film photography as a whole.

By Daren
Daren is a journalist and wedding photographer based in Vancouver, B.C. He’s been taking personal and professional photos on film since 2017 and began developing and printing his own photos after wanting more control than what local labs could offer. Discover his newest publications at Soft Grain Books, or check out the print shop.